
You can use Report Designer to amend the standard Sage 200 reports and documents ( layouts, letters and labels) provided with Sage 200 or create new ones.
Open: Report Designer > Report Designer.
Note: To access Report Designer, your user account must be a member of a role with access to Report Designer features. This is set in Sage 200 System Administration.
You can:
Make changes to the standard reports and documents.
Add or remove criteria.
Divide information into groups.
Sort the order that the information appears.
Filter the information that appears.
Change the styles that are applied, such as the font and size of the text, headings etc.
Add images.
Generate your reports and documents in a variety of file formats, such as pdf, html, csv.
Reports and documents are stored in three levels:
Company
This for reports and documents that you have customised for a specific company.
Custom
This is for report and documents that you have customised and are used by all your Sage 200 companies.
Default
This are the standard reports and documents provided by Sage 200.
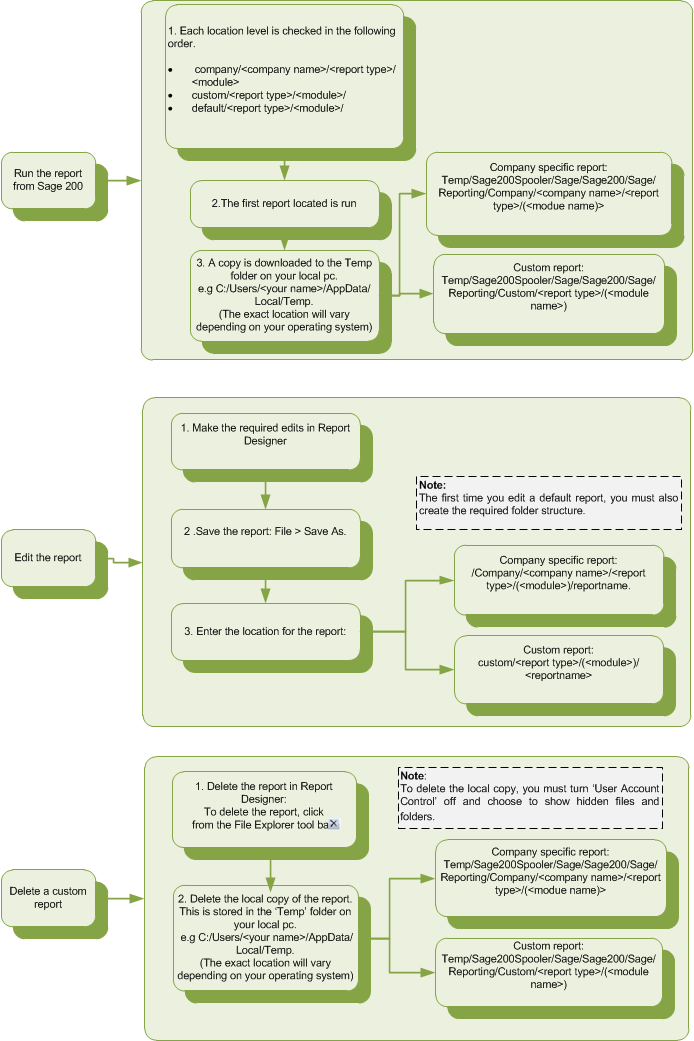
When a report is run or document is printed, the company specific versions are checked first, then the custom versions and finally the default versions. The first version of the report of document located is used.
To make sure the new or edited report or document is run when the reporting or printing option is selected in Sage 200, you must save any customised reports or documents to the custom or company folder, using the same folder structure and the same name as the default version.
Reports are stored in a folder structure based on the report type and module that the report is generated from.
For example: Sales Ledger reports are stored in the reports > sales folder, stock reports are stored in the reports > stock folder and so on.
Company specific reports are stored using this folder structure: company/<company name>/reports/<module name>
Reports and documents are stored in the Sage > Reporting folder.
You must save any customised reports and documents to the custom or company folder, using the same folder structure and the same name as the default report.
When Sage 200 is first installed the required folder structure for the company specific reports and documents is not created. The first time you save a company specific report or document, you must create the required folders.
To save company specific reports and documents:
To save custom reports and documents:
To save company specific reports and documents:
Right-click on the Company folder and create the required folder structure :
Note: Folder names are always saved in lower case.
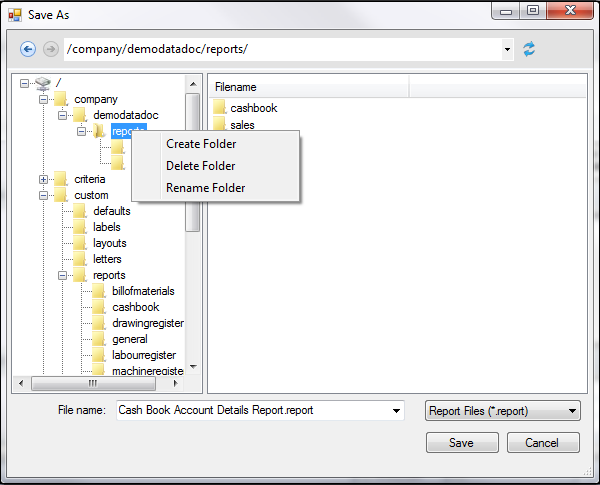
Save the report in the required folder with the same name.
If you change the Purchase Ledger Day Book Report for a company called Demonstration, you must save it in the following location with the same report name:
company/demonstration/reports/purchase/ Purchase Ledger Day Book .Report.
To save a sales invoice layout for the Demodata company, save the layout in the following folder structure: /company/demodata/layouts/Sales Invoice.layout.
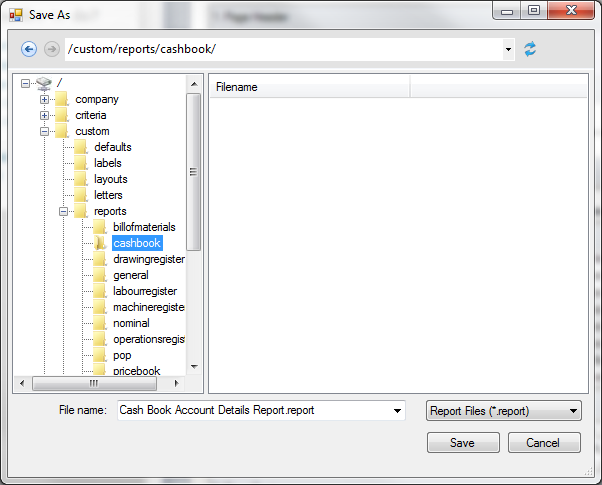
To save custom reports and documents:
Save the report with the same name and in the same folder structure as the default.
A local copy of the report is downloaded to the Temp folder on your local PC. The location of the Temp folder depends on your operating system. For most users this is C:/Users/<your user name>/AppData/Local/Temp. The local copies of your reports and documents are stored here:Temp/Sage200Spooler/Sage/Sage200/Sage/Reporting/.
When you delete a report or document you must also delete the local copy.
Note: To see the local copies, you must turn Windows User Account Control off and choose to show hidden files and folders.
To delete a report or document:
To add a report to the menu as a new menu item, you must have access to the System Administration and the Desktop Design Mode in Sage 200.
Create a new feature and target for the report in System Administration.
Open: System Administration> Features
Add the new feature to a role/roles. This is to make sure the correct Sage 200 users can access the new report.
Add a new menu item to the menu in Sage 200 and associate it with the target you have created.
Open: Sage 200 > Tools > Menu Design Mode.
Note: You can replace standard reports in Manufacturing modules, using the Custom Layouts option in Manufacturing System Manager.
Other tasks
Sending reports and documents via email
Custom layouts in Manufacturing
Overview
Reports and documents in Sage 200
Reference